Protecting Mac OS X systems is a hot topic these days. Their prevalence in enterprise environments has been on the rise over the past decade, and the question of how to secure them remains a mystery to many. This post will discuss new methods for securing Mac OS X.
The internal security teams at Etsy, Facebook and GitHub recently released an interesting project: Mac OS X Intrusion Detection & Analysis System (MIDAS). MIDAS is an open source HIDS that was designed around the Mac OS X operating system. It is still in it’s infancy, having only been published a few months ago. The code is up on GitHub under an Open Source license. As you may know we love open source projects at AlienVault, so we are very excited about this. Also very few alternatives exist both in open and closed source markets for OS X.
MIDAS is implemented as a collection of ‘modules’, and the authors provide a few elementary modules that serve as examples for how to write your own:
- Property Lists (.plist files)
- Kernel Extensions
In addition to these full modules, they provide helper functions to make building your own modules easier. Some helpers include:
- List (weak) ssh keys
- Return SSID of currently connected network
- List DNS configuration information
- list all LaunchAgents and LaunchDaemons
MIDAS writes its results to a directory of log files:
/logs/.log
MIDAS has a built in custom Object Relational Mapping (Called Trip Yarn ORM or TyORM), and results fall into three categories: new, changed, and removed. Examples of each result type are shown below, respectively:
2014-02-13T16:30:48-0800 ninja.local ty[example_analyzeplist]: ty_name="plist" keepalive="{'SuccessfulExit': None}"hash="29f062b5a12277e48f323c03c5e882c40506fd62"date="Thu, 13 Feb 2014 16:32:29"name="/System/Library/LaunchDaemons/com.apple.awacsd.plist"

2014-02-14T15:56:49-0800 ninja.local ty[example_analyzeplist]: ty_name="plist" name="/Users/bsmartt/Library/Preferences/ByHost/com.apple.identityservices.idstatuscache.D285B31B-51C2-50FF-8434-8F5E42C601AE.plist" changed_entry="true" hash="37705f72ba62d13e79ebdc78223fc3ff184e8587" hash_old="c9cda73684b65d7fcee80188d3ad4dfaec28f4b2" hash_last_updated="Fri, 14 Feb 2014 15:56:50" hash_diff_added="c9cda7684b65dee808d3addfac2f4b2" hash_diff_removed=“705f72ba62d13e79ebdc782233ff587"

2014-02-18T23:06:40-0800 ninja.local ty[example_analyzeplist]: ty_name="plist" removed_entry="true" name="com.vmware.vmioplug.10.1.26" date="Tue, 18 Feb 2014 20:56:44"
MIDAS doesn’t have any centralized collection and there is no concept of an ‘alarm’, so it expects you can do that in your environment. While MIDAS would probably work fine with any SIEM, AlienVault’s OSSIM is the only open source SIEM and therefore it is an ideal candidate for MIDAS integration. Integrating MIDAS with AlienVault products is simple. Let’s take a look:
First you will need an OS X machine with MIDAS on it. Our fork of MIDAS comes with everything you need for the integration. Our repository also contains some additional detection metrics including a module to watch user creation and removal, to detect payloads that add or remove user accounts. Grab the MIDAS source code from our repository and put it on a Mac. Our repository is here.
To configure MIDAS on the OS X endpoint:
- Install the netsyslog package for python. This is how the logs will be sent to USM.
- Add the IP of your USM instance to the MIDAS configuration: /midas/modules/lib/config.py: config[‘alienvault_instance’] = "1.2.3.4"
Moving on to USM, we need to enable the MIDAS plugin. There are two files that USM needs from our MIDAS repository:
- alienvault_integration/midas.cfg
- alienvault_integration/midas.sql
Put these two files on your USM instance then you can copy the plugin (.cfg) file to the plugins directory:
cp midas.cfg /etc/ossim/agent/plugins/
Update the SQL table definitions:
ossim-db < midas.sql
Restart the server:
/etc/init.d/ossim-server restart
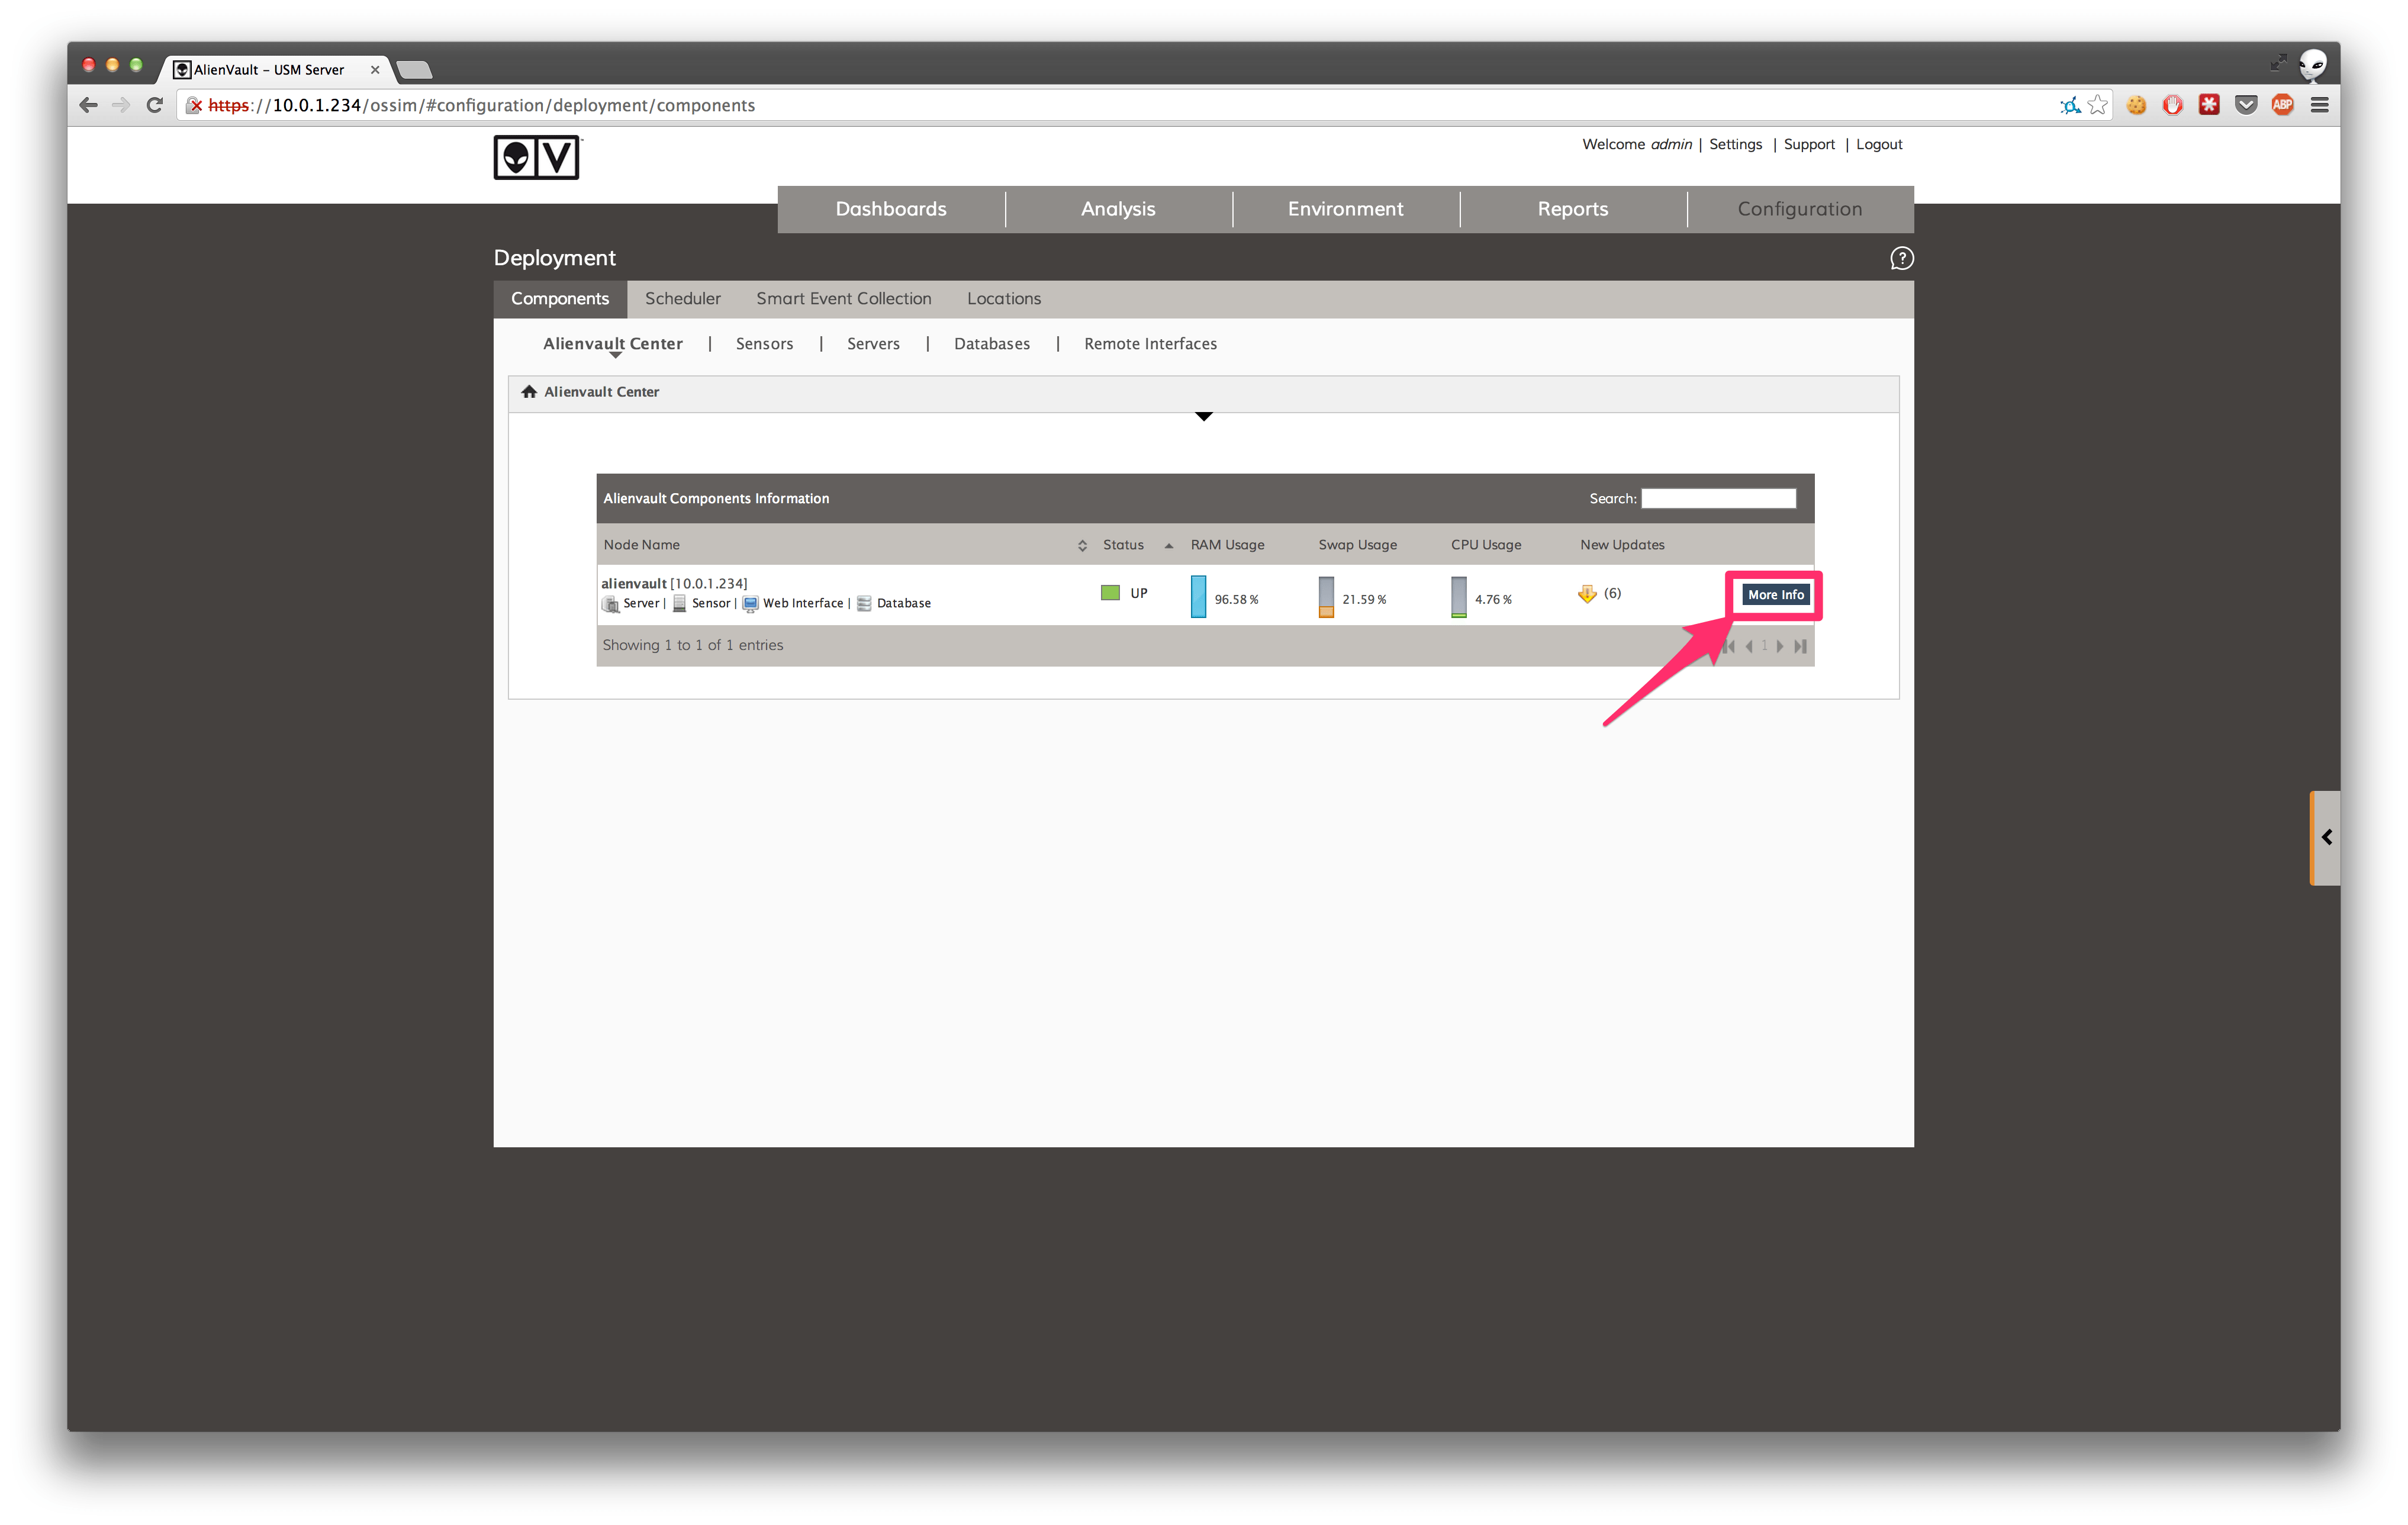
Next, in the web UI, enable the MIDAS plugin. Inside Configuration > Deployment, find your USM instance in the AlienVault center and click more info on the right:
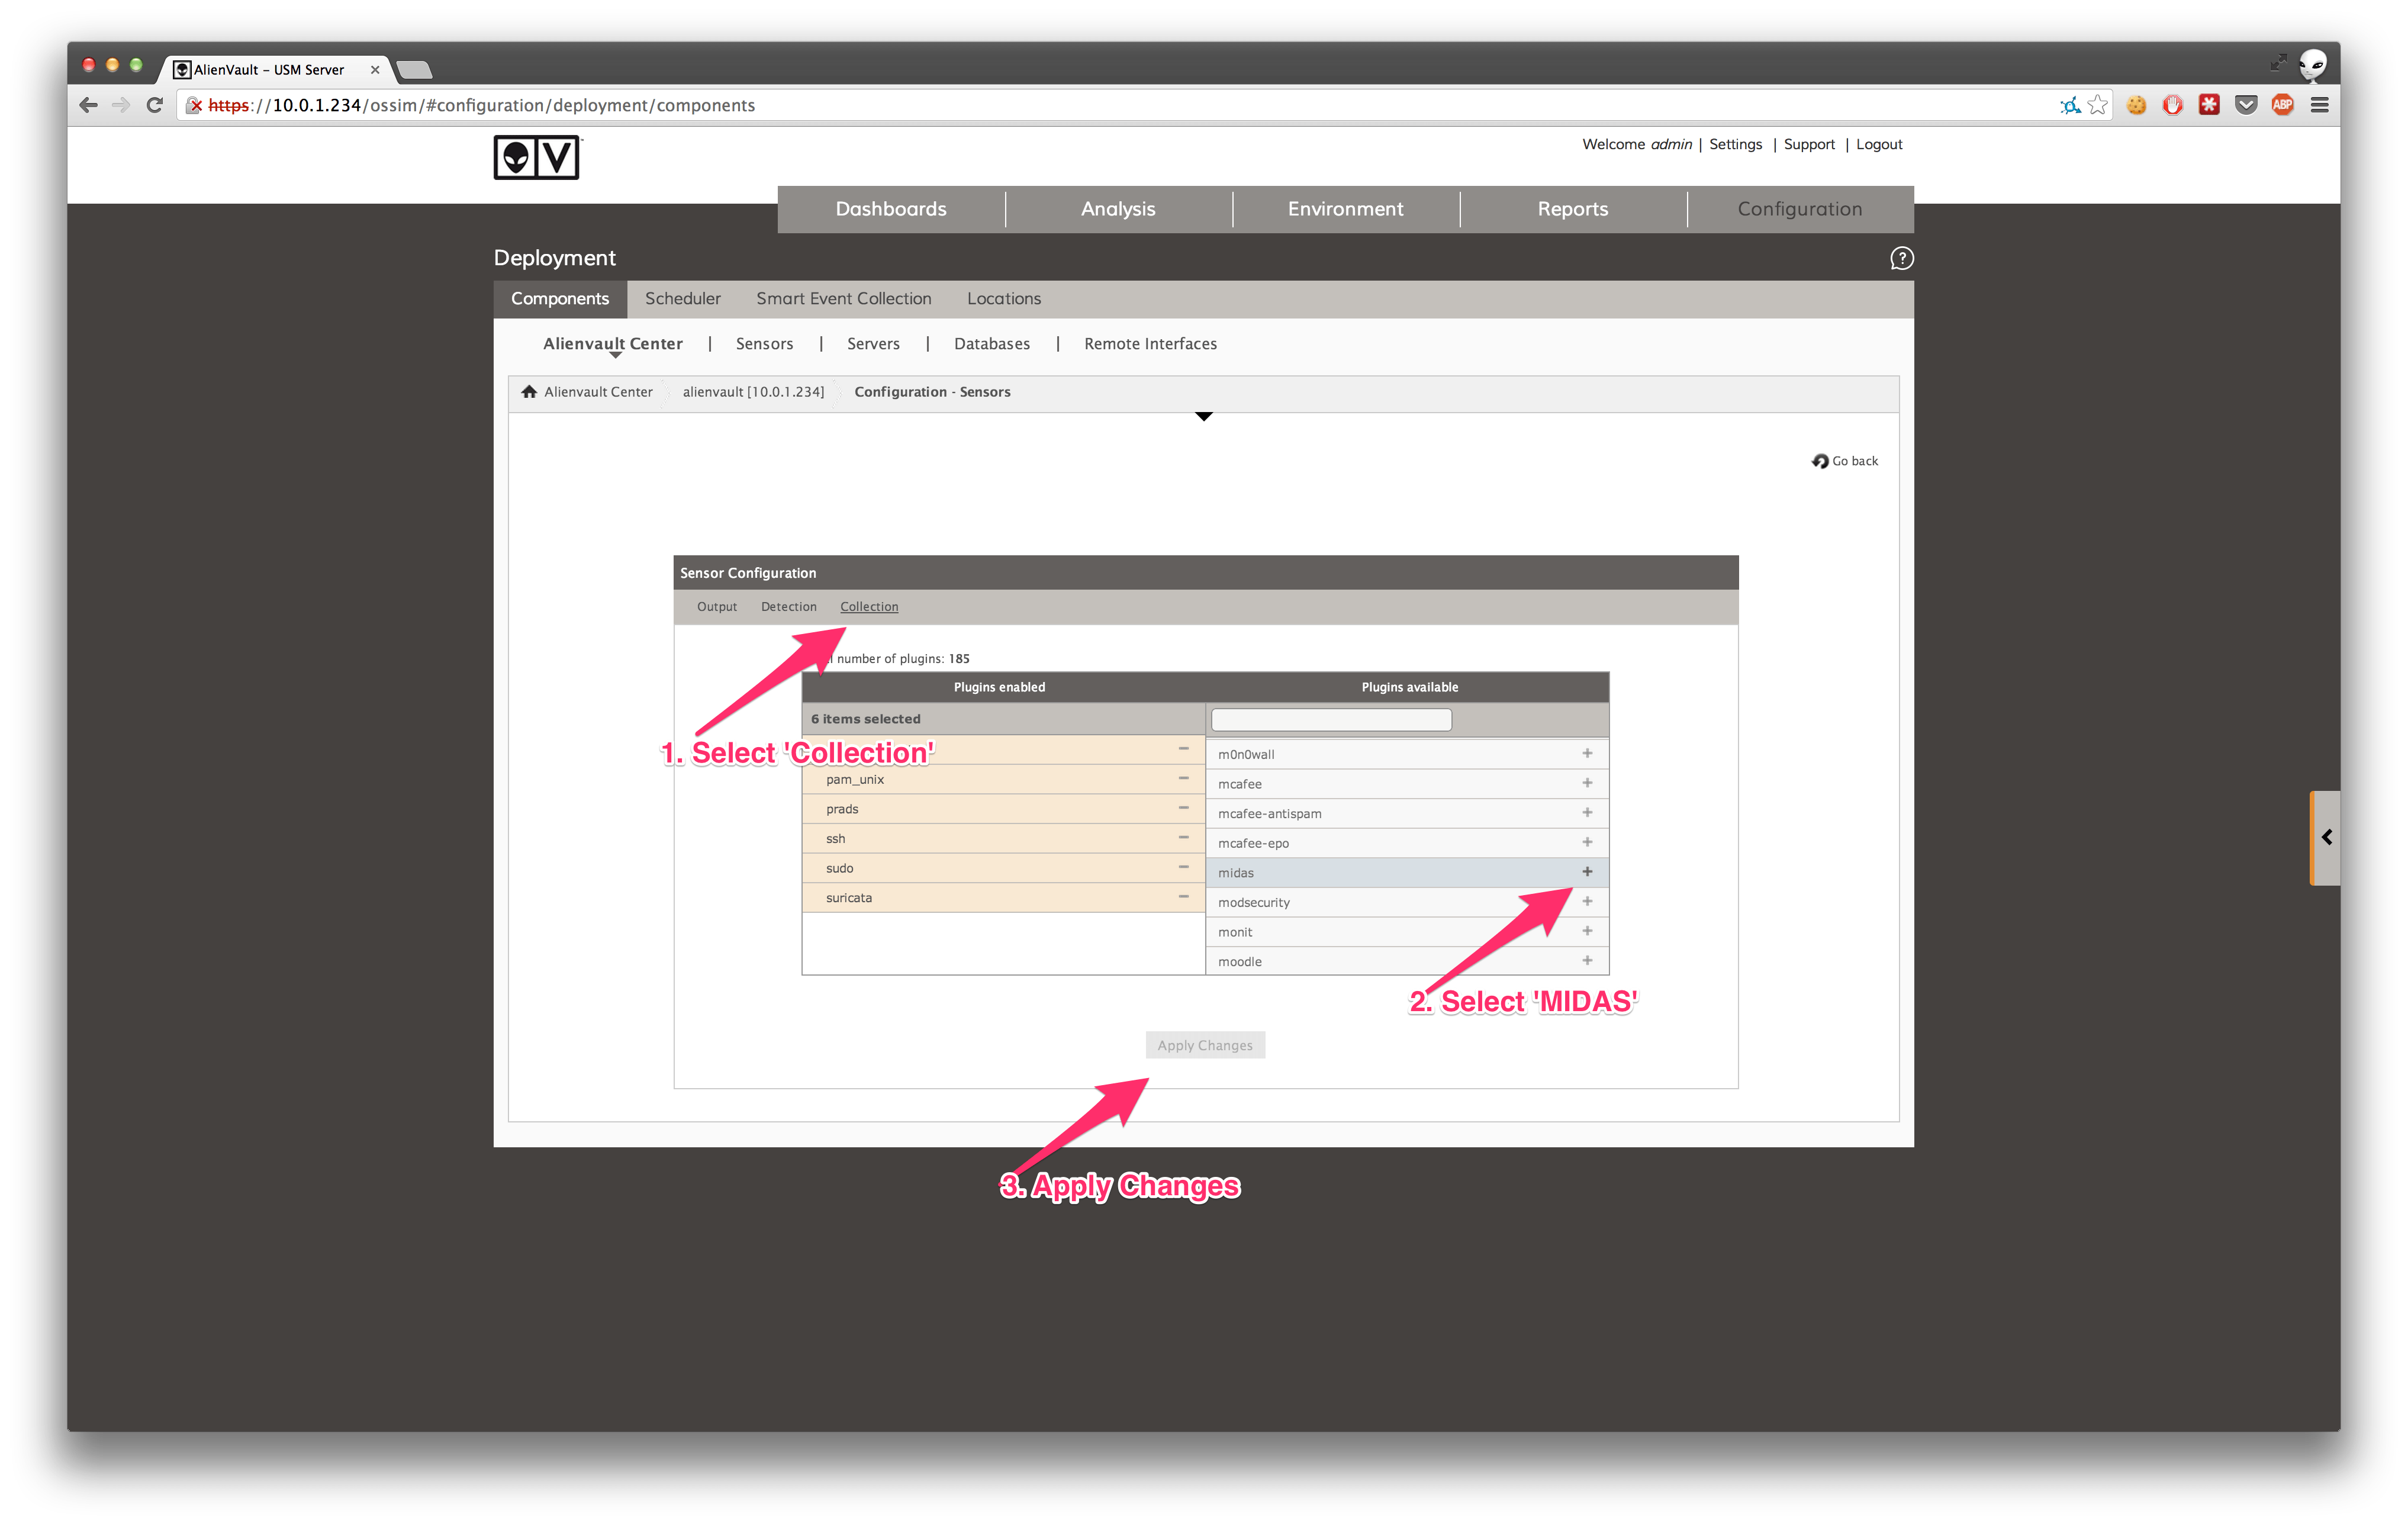
Go to the Sensor Configuration tab:

Inside the Sensor Configuration, go to the deployment section, find MIDAS in the list, and click the +. Click ‘Apply Changes' to enable MIDAS. If you don’t see MIDAS in the list of available plugins, you may have forgotten to add the midas.cfg file to the plugins directory, or run the ossim-db command above.
Now that the MIDAS plugin is enabled, we can test it by sending some example log messages to syslog and confirming their presence in the SIEM. For this we have provided an example MIDAS log in the repository:
/alienvault_integration/example.log
You can send these example events to the USM syslog by issuing the following command:
cat example.log > /var/log/syslog
You should now see these events in the SIEM events:

If you examine an event in detail, you can confirm the plugin is correctly parsing the log messages. Here we see that a new plist was discovered on 10.0.1.90:

We now have events flowing from the OS X machine to USM. MIDAS is not a daemon or agent so it needs to be invoked in order to run. You can execute MIDAS by running
sudo python launcher.py
This will create the database file on first run in the working directory named midas_hids.sqlite. Now when you run MIDAS rather than the valuable data it generates sitting in a log file on one of your endpoints, the data goes straight to USM where we can leverage other data sources and types of analysis for enhanced security posture.
Stay tuned for a followup on running MIDAS scheduled task (launchctl), detecting malware with MIDAS and USM, and correlation directives.