 Role Availability Role Availability
|
 Read-Only Read-Only
|
 Investigator Investigator |
Analyst
|
Manager
|
USM Anywhere includes a set of labels to further classify your alarms. See Searching Alarms for more information.
You can't edit or delete the set of default labels:
USM Anywhere enables you to create, edit, and delete your own labels. You can apply a label to one or more alarms. You can also apply multiple labels to the same alarm. To distinguish between labels and statuses, see
Note: Users in the Investigator role can apply and remove labels but cannot create, edit, or delete labels.
To label an alarm from the Alarms main page
- Go to
- Search for the alarm or alarms to which you want to apply a label.
-
Complete one of these options:
-
Click the
 icon in the labels column of the alarm you want to label, select the label, and click Save.
-
Select the checkbox to the left of an alarm, click Apply Labels, select the label, and click Save.

-


To label an alarm from the Alarms Details page
- Go to
-
Search for the alarm to which you want to apply a label.
See Searching Alarms for more information.
- Click the alarm.
- Click Apply Labels and select a label.
- Click Save.
To create a new label
- Go to
-
Select the checkbox to the left of an alarm.
You can also select several alarms or select all alarms at the same time by selecting the first checkbox in the column.
- Click Apply Labels.
- Click Manage Custom Labels.
-
Click Create New Label.
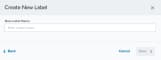
- Enter a name for the label.
- Click Save.

To edit a label
- Go to
-
Select the checkbox to the left of an alarm.
You can also select several alarms or select all alarms at the same time by selecting the first checkbox in the column.
- Click Apply Labels.
- Click Manage Custom Labels.
- Click the
 icon next to the label you want to edit.
 - Modify the name of the label.
- Click the
 icon to apply the changes.
To delete a label
- Go to
-
Select the checkbox to the left of an alarm.
You can also select several alarms or select all alarms at the same time by selecting the first checkbox in the column.
- Click Apply Labels.
- Click Manage Custom Labels.
-
Click the
 icon next to the label you want to delete.
- Click Delete to confirm the deletion.

To remove a label from an alarm
- Go to Activity > Alarms.
-
Do one of these options:
- Select the checkbox to the left of an alarm. You can also select several alarms or select all alarms at the same time by selecting the first checkbox in the column. Then click Remove Alarm Labels, click the label, and click Remove.
- Locate the alarm from which you want to remove the label, and click the icon next to the label.
 Feedback