 Role Availability Role Availability
|
 Read-Only Read-Only
|
Investigator |
Analyst
|
Manager
|
USM Anywhere provides a centralized view of managing your asset groups Asset groups are administratively created objects that group similar assets for specific purposes.. Go to Environment > Asset Groups to see this centralized view. It has the same look and feel as the asset list view and the functionalities are the same as well. The difference is that in this view, you are managing asset groups instead of assets An IP-addressable host, including but not limited to network devices, virtual servers, and physical servers..
By default, AT&T Cybersecurity creates these dynamic asset groups:
- Assets with Agents: Asset group containing assets with agents.
- Assets with Alarms Alarms provide notification of an event or sequence of events that require attention or investigation.: Asset group containing assets with alarms.
- Assets with Vulnerabilities: Asset group containing assets with vulnerabilities.
- Database Servers: Asset group containing database servers.
- HIPAA: Asset group containing Health Insurance Portability and Accountability Act (HIPAA) assets. HIPAA is a standard for protecting sensitive patient data.
- Linux Assets: Asset group containing Linux systems.
- PCI DSS: Asset group containing Payment Card Industry (PCI) assets.
- Web Servers: Asset group containing web servers.
- Windows Assets: Asset group containing Microsoft Windows systems.
USM Anywhere also creates a default asset group for each Amazon Web Services (AWS) Elastic Load Balancing (ELB) Elastic Load Balancing automatically distributes incoming application traffic across multiple Amazon EC2 instances in the cloud. instance in your environment. The AWS Sensor ELB group includes the ELB instance and any AWS Sensor instance connected to the load balancer and registered with the ELB service. USM Anywhere automatically discovers and enables you to collect ELB access logs if you have ELB access logging enabled.
Note: It is not possible to edit or delete a dynamic asset group created by default.
The asset groups page displays asset groups inventory and information on those asset groups. On the left you can find the search and filter options. In the upper side of the page, you can see any filters you have applied, and you have the option to create and select different views of the asset groups. The main part of the page is the actual list of asset groups. Each row describes an individual asset group.
If you want to analyze the data, you can maximize the screen and hide the filter pane. Click the ![]() icon to hide the filter pane. Click the
icon to hide the filter pane. Click the ![]() icon to expand the filter pane.
icon to expand the filter pane.
USM Anywhere creates by default static and dynamic asset groups. See Creating an Asset Group.
| Column Field Name | Description |
|---|---|
| Group Name | Name of the group. |
| Group Description | Text identifying the group. |
|
Assets |
Number of assets in the group. |
| Asset Grouping | Type of asset grouping: static or dynamic. |
| Created | Exact date of creation of the asset group. The displayed date depends on your computer's time zone. |
Next to the asset group name, ![]() icon to access the following options. Your access to these options may vary based on your user role. See Role-Based Access Control (RBAC) in USM Anywhere for more information:
icon to access the following options. Your access to these options may vary based on your user role. See Role-Based Access Control (RBAC) in USM Anywhere for more information:
- Full Details: See Viewing Assets Details for more information.
- Asset Group Scan: This option displays depending on the USM Anywhere Sensor associated with the asset. See Running Asset Groups Scans for more information.
- Assign Credentials: See Managing Credentials in USM Anywhere for more information.
- Authenticated Scan: Authenticated scans are performed from inside the machine using a user account with appropriate privileges. This option displays depending on the USM Anywhere Sensor associated with the asset. See Running Authenticated Asset Scans for more information.
- Configuration Issues: An identified configuration of deployed software or features of software that is in use, which is known to be insecure. This option opens the Asset
- Vulnerabilities: This option opens the Asset
- Alarms: This option opens the Asset
- Events: Any traffic or data exchange detected by AT&T Cybersecurity products through a sensor or external devices such as a firewall. This option opens the Asset
You can choose the number of items to display by selecting 20, 50, or 100 below the table.
Click Generate Report to open the Configure Report dialog box. The management of this feature is similar to the one for assets, see Create an Assets Report for more details.
Select Actions > Static or Actions > Dynamic to create an asset group. See Creating a Static Asset Group and Creating a Dynamic Asset Group for more details.
Click the ![]() icon to bookmark an item for quick access.
icon to bookmark an item for quick access.
Views
You can configure the view you want for the list of items in the page.
To create a view configuration
- From the list view,
-
Go to Save View > Save As.
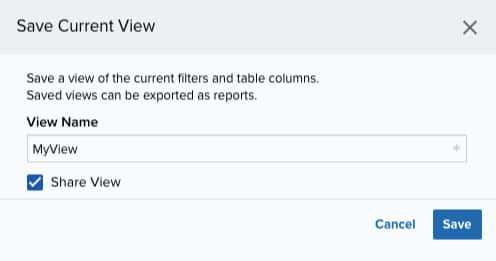
The Save Current View dialog box opens.
- Enter a name for the view.
- (Optional.) Select Share View if you want to share your view with other users.
- Click Save.
The created view is already selected.
To select a configured view
- From the ist view, click View above the filters.
-
Click Saved Views, and then select the view you want to see.
- Click Apply.
Note: A shared view includes the ![]() icon next to its name.
icon next to its name.
To delete a configured view
- From the
- Click Saved Views, and then click the
 icon next to the saved view you want to delete.
 - Click Accept.
A Settings Delete dialog box opens to confirm the deletion.
Important: The ![]() icon does not display if the view is selected.
icon does not display if the view is selected.
Note: . You can only delete the views you have created .
 Feedback