In USM Anywhere, you can generate reports for a single use or schedule them to run at recurring intervals. After a report has been saved, you can access or modify it at any time from the Saved Reports page.
Report Parameters and Features
The report templates are broken into two sections: Parameters & Export Settings and Format Output. When you create a new report or edit an existing one, you can customize each section to your own needs.
Parameters & Export Settings
In the Parameters & Export Settings section, you see the following fields:
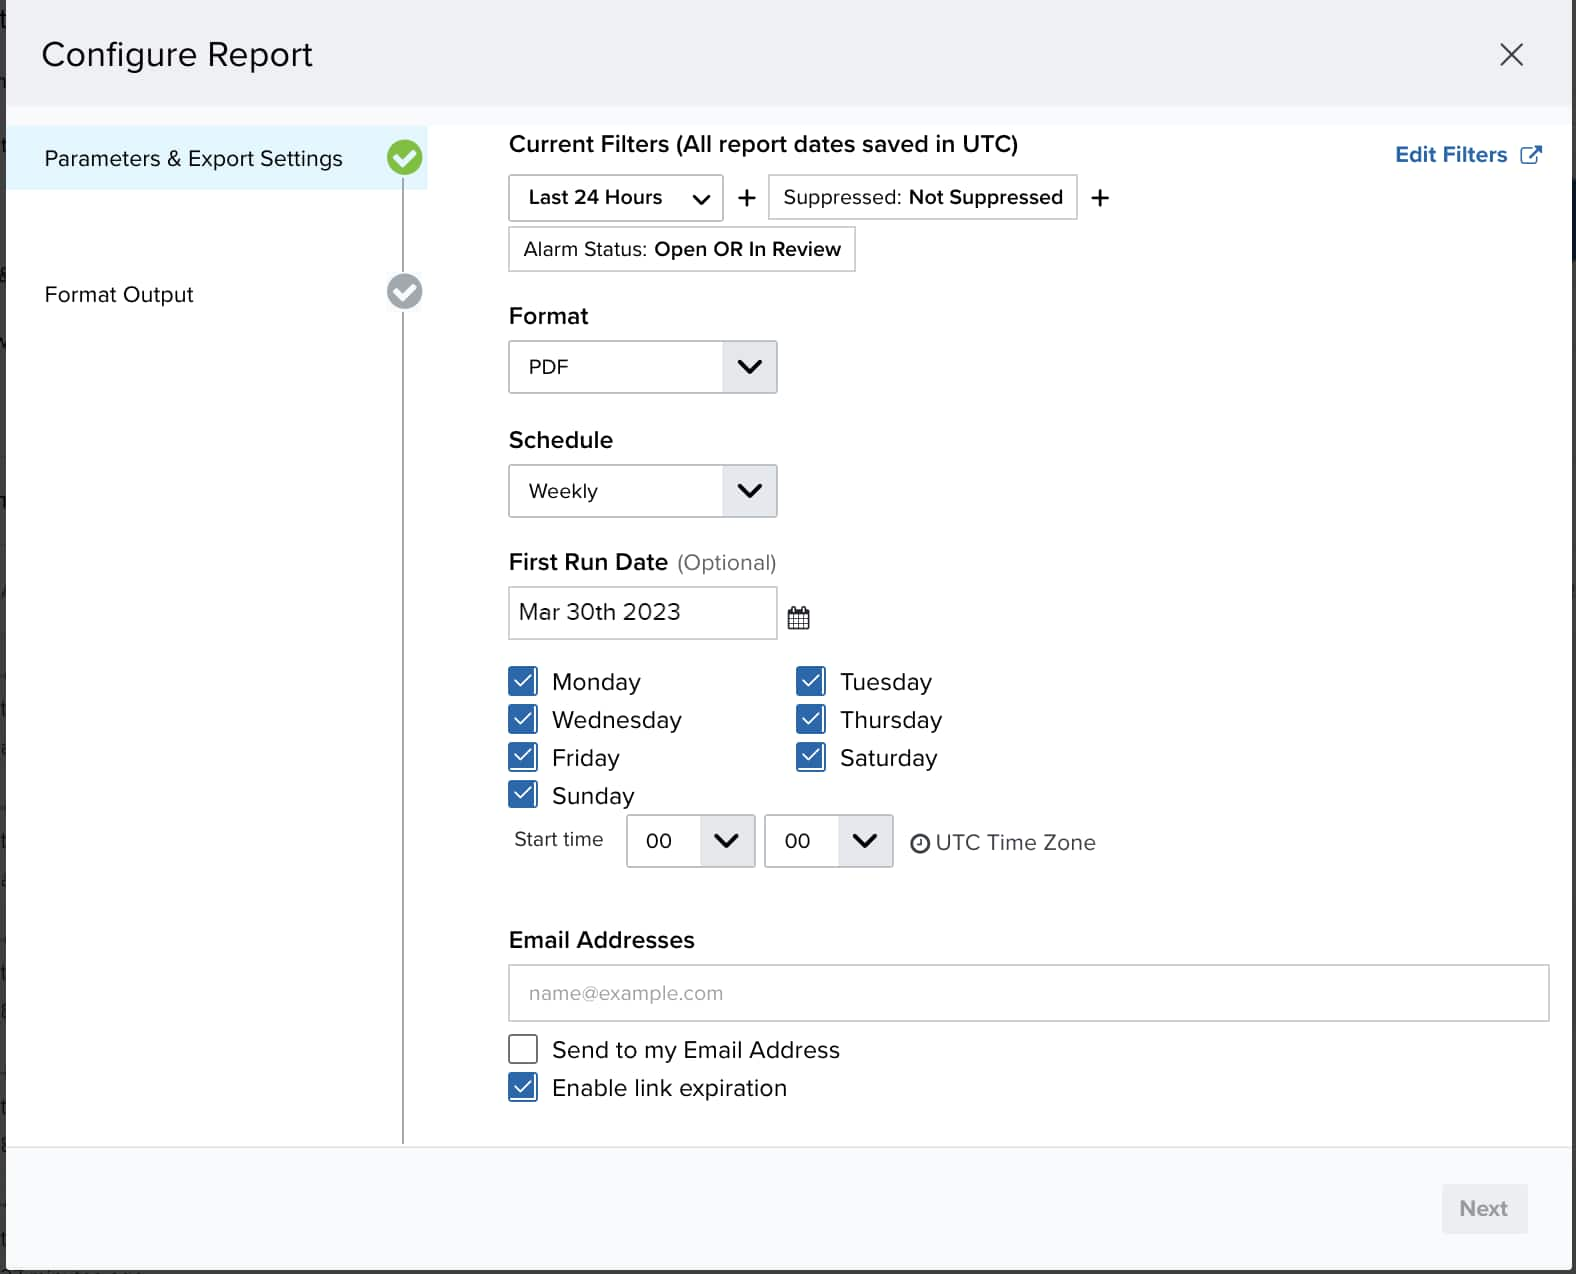
- Current Filters: Specify the filters for the information to be displayed. Click Edit Filters to change the filters from the corresponding page.
-
Format: Choose whether to export the information as a comma-separated values (CSV) or PDF file. Only PDF files can use the Graphs feature in the Format Output section.
Note: If your filter includes a timestamp column, such as Time Created or Last Updated, the CSV formatted report inserts an additional column with the timestamp in the ISO 8601 format. For example:
Time Created Time Created ISO 8601 Tue, Feb 15 2022, 02:48 PM 2022-02-15T14:48:43.596 This way you can sort the timestamp column based on the time it occurred. The ISO 8601 formatted timestamp matches the time zone of their responding timestamp column, which concurs with the browser's time zone of the user who generated the report.
- Schedule: Define the frequency at which the report is generated. Options are Daily, Weekly, Bi-Weekly, Monthly, or Yearly. Select Never if you only want to run the report once.
- First Run Date: The first date the scheduled reports will be generated.
- Repeat On: Select the options for scheduling the report based on the schedule frequency.
- Start Time: Select what time in UTC the report will be generated for the schedule selected.
-
Date Range: Define the date range of what the filtered content will include in the report.
Note: This option is not available when generating reports for assets or asset groups.
-
Email Report: Enter any email addresses to which you would like the report to be sent. Multiple addresses can be separated by a comma and a space.
Note: The subject of these emails assumes the following format:
$SUBDOMAIN USM Report Notification: $REPORT_NAME
Where $SUBDOMAIN is the subdomain of your USM Anywhere instance and $REPORT_NAME is the name you specify for the report.
- Enable Link Expiration: Select the checkbox if you would like the download link in the emails to expire after 14 days.
Format Output
In the Format Output section, you see the following fields:
- Report Name: The name you want to use for the report. This name will be displayed in the Saved Reports page.
- Report Description: An optional description of the report. This will be included in the notification emails.
- Record Limit: The maximum number of records to be contained in the report. For CSV, the options are 20, 50, 100, 500, 1000, or 50 K. For PDF, the options are 20, 50, 100, 500, 1000, or 2500.
- Graphs (PDF reports only): Add or remove graphs to the PDF reports. Click the arrow buttons to add or remove graphs in the right table to be included with the reports.
Generate a Report
You can create reports on assets, alarms, events, configuration issues, or vulnerabilities by clicking the Generate Report button on the relevant page. You can also create reports based on compliance or event type templates. USM Anywhere drafts the report based on the filters currently displayed on the page or predefined in the template, which you can modify during the configuration.
To create a report
- Go to the page for which you want to create a report.
- Select the filters or template you want to be used for the report.
-
- Click Edit Filters to add any additional filters you want to include in the report.
-
Select the date range for the information included in the report.
You can select a predefined range of Last Hour, Last 24 Hours, Last 7 Days, or Last 30 Days, or you can set your own date range by clicking the icon.
icon.Note: This option is not available when generating reports for assets or asset groups.
- Under Format, select either CSV or PDF.
-
Under Repeat, click the drop-down list to select how often you want the scheduled report to be generated.
If you don't want the report to be recurring, leave the selection as Never.
If you have selected a time interval for recurring reports to be generated, the First Run Date, Repeat On, and Time sections show up below the Repeat section:
- First Run Date: Select the day you want the first report to be generated.
- Schedule: Define the frequency at which the report is generated. Options are Daily, Weekly, Bi-Weekly, Monthly, or Yearly. Select Never if you only want to run the report once.
- Time: Select the UTC time you want the reports to run on the days they're generated.
-
In the Email Addresses section, enter the email addresses of the people to whom you want the report to be sent when it is generated. Select Enable Link Expiration if you want the link to the report to expire after 14 days.
Note: The subject of these emails assumes the following format:
$SUBDOMAIN USM Report Notification: $REPORT_NAME
Where $SUBDOMAIN is the subdomain of your USM Anywhere instance and $REPORT_NAME is the name you specify for the report.
- Click Next to go to the Format Output section.
- In the Name field, enter a name for the report.
This name displays in the Saved Reports page. You can also add a description that will be included in the generated emails. - For Number of Records, choose the maximum number of records to be included in the report.
- If you have chosen the PDF format, use the Graphs section to include additional views. You can add or remove graphs included in the report by clicking the
 and
and  icons.
 - Select Save & Run to save your report and run it, or select Run if you don't wish to keep the report in your Saved Reports page.
 Feedback