The content of this post is solely the responsibility of the author. AT&T does not adopt or endorse any of the views, positions, or information provided by the author in this article.
In a network assessment, one of the first tasks is to narrow down a large set of IP addresses to a list of active or interesting hosts. It's like trying to find specific houses in a big neighbourhood without knocking on every door. Scanning every possible connection of every single IP address can be slow and often unnecessary. What makes a host interesting depends on what you're looking for. For example, network administrators might only care about devices running specific services, while security experts might want to know about every device with an IP address.
Imagine a scenario, where a network administrator wants to find all the computers in their office network. They might just want to send a quick signal (like a ping) to see if each computer responds. But if someone outside the network is testing security, they might try different tricks to avoid detection by firewalls and uncover every possible connection.
Host discovery serves as the initial phase of network reconnaissance, laying the groundwork for subsequent analysis and exploitation. Host discovery refers to the technique used in a network assessment to find live hosts (online systems) and narrow down the scope of assessment to live hosts only in a network. In this article, we will delve into various ways to perform host discovery in a network using Nmap, netdiscover and angry ip scanner.
For this exercise I have used a virtual local area network (LAN) network configured on my local system. The IP range I will use in this exercise is for my network. You have to find your IP before starting a scan for hosts in your LAN. I have used host only as network adapter in my virtual machines, but you can also use NAT.
Before moving on to the tools let’s check the IP first and make sure it is in same network range on all the machines. Replace my IP with your while reciprocating the steps.
Before proceeding to Nmap and netdiscover, let’s take a look at the ip configuration of Kali linux:
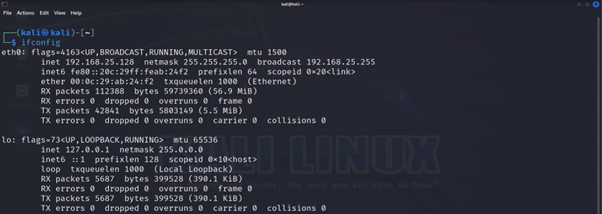
Image: LAN IP address kali (192.168.25.128)
Nmap:
Nmap is an Open-source command-line network mapping and scanning tool which allows the security analysts and network administrators to perform various functions including host discovery, OS detection, Service version detection and much more. Nmap also offers a GUI version named Zenmap for windows users.
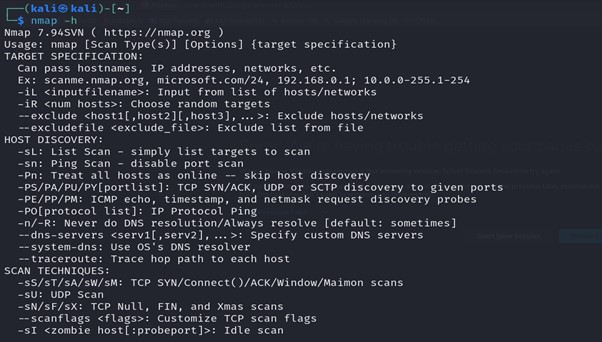
Image: Nmap help section
Steps for Host Discovery with Nmap:
1. Ping Scan (-sn): This scan sends ICMP echo requests to a range of IP addresses to determine which hosts are online without scanning ports.
Syntax: nmap -sn 192.168.25.0/24
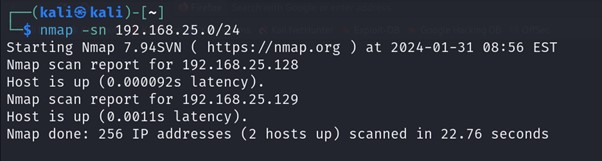
Image: Host discovery using ping scan in Nmap
2. TCP SYN Scan (-sS): This scan sends SYN packets to target hosts and listens for SYN-ACK responses to determine if the host is alive as well check for most common 1000 ports on the live hosts. This scan will require user to be a part of sudoers group or have administrative priviliges.
Syntax: sudo nmap -sS 192.168.25.0/24
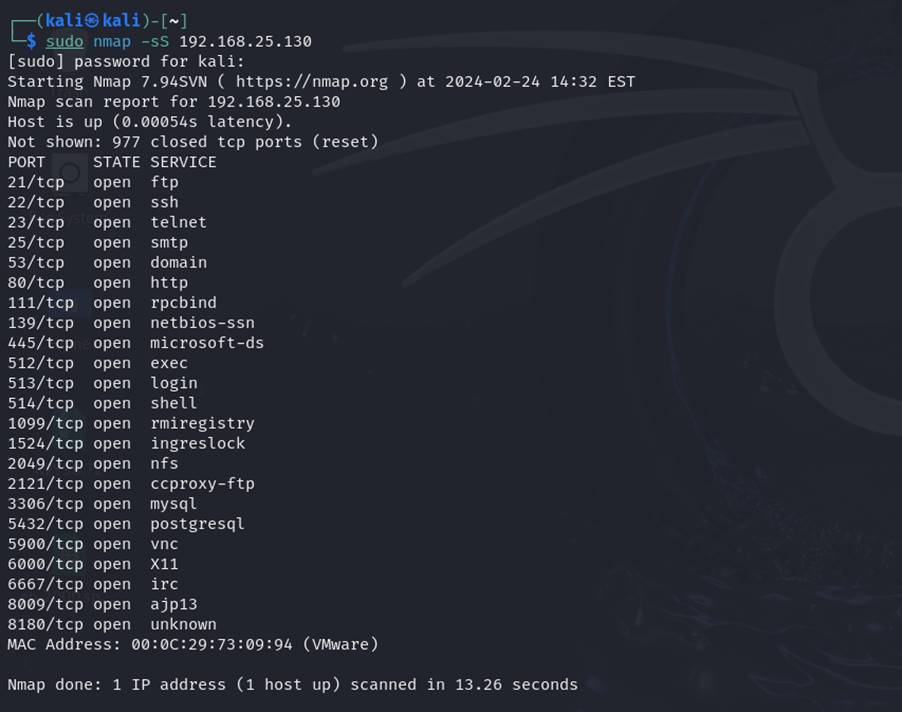
Image: Nmap Syn Scan
Netdiscover:
Netdiscover is an active/passive ARP reconnaissance tool, it can passively detect online hosts, or search for them, by actively sending ARP requests. Netdiscover uses the OUI table to show the vendor of each MAC address discovered and is very useful for security checks or in pentests. Let’s take a look at Netdiscover help section by using command netdiscover -h in your Linux machine’s terminal.
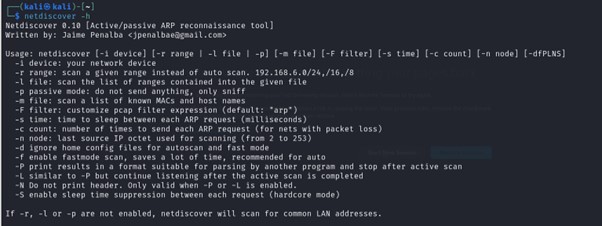
Image: Netdiscover help section
Steps for Host Discovery with Netdiscover:
·Scan All Live Hosts on the Network in a network range:
Syntax: sudo netdiscover -r 192.168.25.0/24
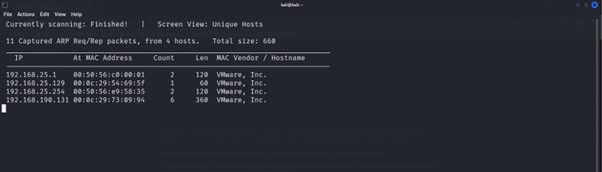
Image: Netdiscover host discovery
Angry IP Scanner:
For those seeking a user-friendly alternative to command-line tools, Angry IP Scanner emerges as a GUI alternative for host discovery. With its intuitive graphical interface and cross-platform support, Angry IP Scanner simplifies the process of network enumeration and host discovery for users of all skill levels. Angry IP scanner performs host discovery and port scan on discovered live hosts when utilised.
We will be using Angry IP Scanner in our Windows Machine which is part of other network. Let’s quickly check the IP for windows:
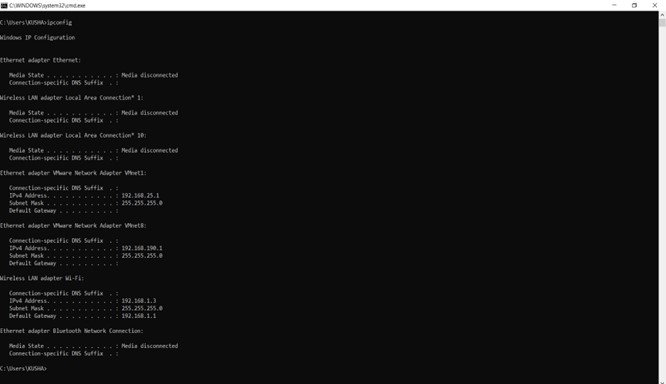
Image: Windows IP Configuration
IP of the Windows Machine(WLAN): 192.168.1.3
IP of the windows Machine for VM adapter: 192.168.25.1 (Angry IP scanner will take the VM network by default, you can edit the network range depending on the network you want to scan.
Steps for Host Discovery with Angry IP Scanner:
1. Launch Angry IP Scanner: Open the Angry IP Scanner application.

Image: Angry IP Scanner Interface
2. Set IP Range: Specify the IP range to scan by entering the starting and ending IP addresses. I have checked that it is taking the IP range of windows machine on VM network by default.
3. Start Scan: Click on the "Start" button to initiate the scan.
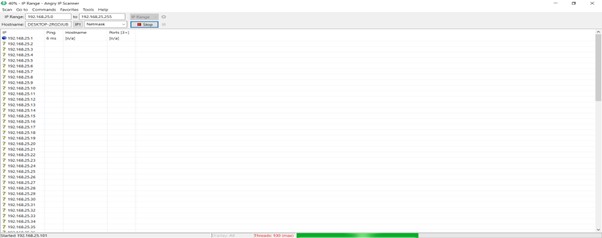
Image: Initialisation of a scan
4. View Results: Once the scan is complete, review the list of discovered hosts and their corresponding details.
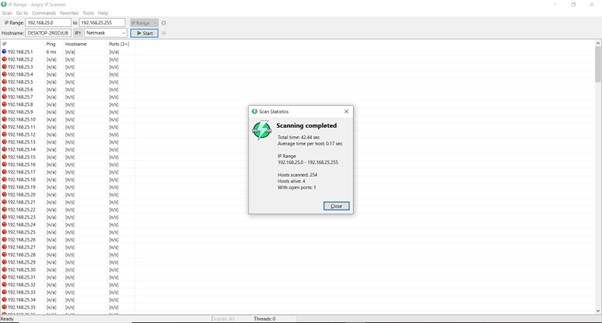
Image: Scan results
Now you can sort by IP or Ping to see the live hosts as shown in image below:
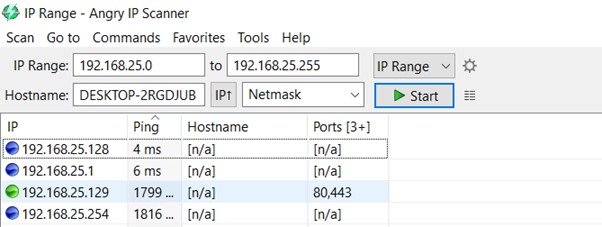
Image: Angry IP Scanner host discovery scan results
While selecting a host discovery technique analysts should compare the results along with various tools to identify the best technique as per their requirement. It is always advised to adhere to privacy regulations, Local laws and organizational policies before performing network scan.