Secure by design is about designing secure environments with real constraints in mind. I state the assumptions used in this post up front because they are going to give context to my security and design advice.
The following assumptions are made about your business and team:
- IT is a skeleton crew and you do not have dedicated security personnel.
- IT services a mostly non-technical staff.
- Your budget is tight or nonexistent.
- You cannot afford to spend time training countless users new procedures.
- You care a lot about making your users and business secure.
Here are my assumptions about your computing environment:
- Primarily Windows and has a Windows Server.
- At least one enterprise switch and router.
- Wi-Fi Access Point that serves employees and guests.
- One device that cannot be patched or is otherwise mandated to stay on an old and vulnerable operating system.
Design Goals
The biggest problem in small-to-medium business security is that no black box will secure their network. They have neither the personnel or budget to have a security team and are often not aware of the threats they need to consider. The looming threat of spooky hackers and the knowledge that nobody is coming to help them makes black box vendor offerings more enticing than any of us would like to admit.
So, let's be pragmatic about our security goals. Let's look at our assumptions and turn them into design constraints and goals.
Constraints:
- Expensive fixes won't happen.
- Cannot introduce additional work for IT
- Must not rely on end user training to be secure
Goals:
- Limit access to the unpatched/vulnerable devices
- Protect high-value assets
- Reduce the internal attack surface
- Few/no visible changes to end user
We are only going to be making changes to the network configuration and hardware at this point. These goals can all be achieved at the network level to great effect.
What do I have?
The first thing you need to do is get a handle on what you have in your network. You can't secure what you don’t know you have. Since securing our network is our objective, the most important information we need is:
- Servers: Applications or Server roles, OS Versions, Open ports
- Clients: OS Versions, roughly how many, where they connect from (remote or on-site, if on-site where on-site?)
- Networking Equipment: Management IP Addresses, Software/Hardware/Firmware versions, licensing/warranty information
- Our network diagrams
Let's look at that diagram
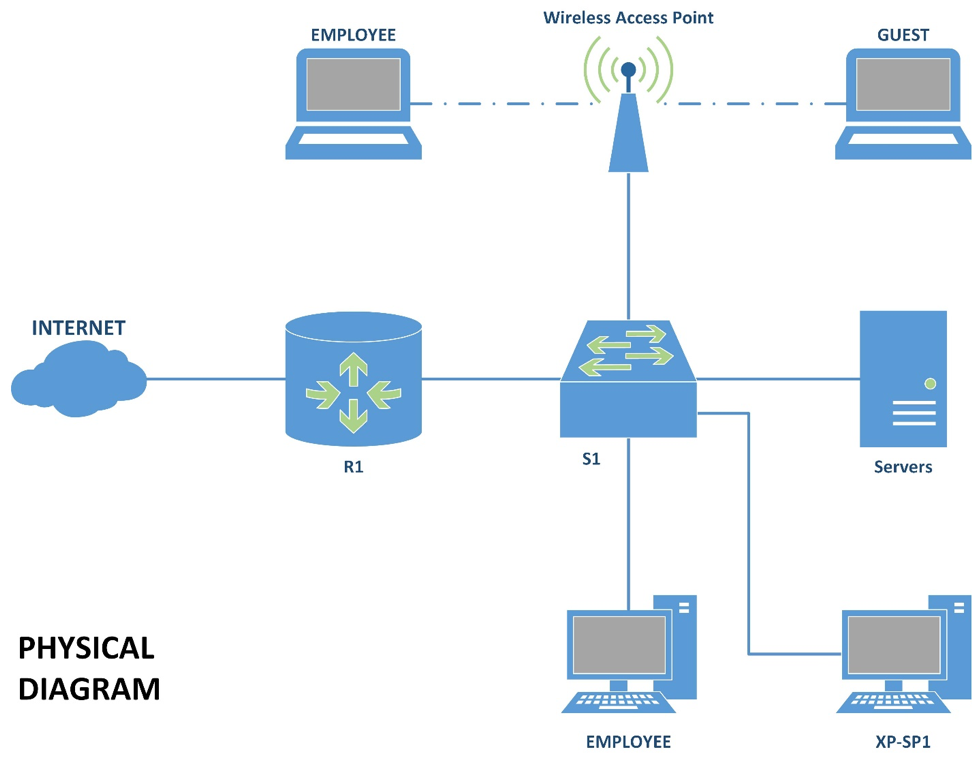
This is the network we will be working with throughout this post. It is missing a lot of key information, so we will fill it out shortly.
This is what network architects call a 'flat' network. Everything is connected to the switch, which is then connected to the router, which then connects out to the internet. My home network is designed in this fashion, as are most people's homes. Unsurprisingly, many small-to-medium businesses are also designed like this because it offers plug-and-play functionality. Connect something to the network and it can talk to everything it needs to.
The fact that every device can directly talk to any other device is both a boon for function, but a problem for security. We want to remove the ability to talk freely without breaking network functionality.
Key Technology
I said that we have an enterprise-grade router and switch. "Enterprise-grade" means that they have expensive licenses and they are highly configurable. If our router and switch support the technologies we want, then we can secure this environment for free.
Our router and switch allow us to do the following:
- Create Virtual Local Area Networks (VLANs) to segment our network
- Create Access Control Lists (ACLs) that will control what parts of the network can talk to what other parts of the network
- Reduce the attack surface of our on-premises network
Depending on your background, the next steps might be obvious or arcane. Computer networking is a complicated discipline. Although I consider this to be basic networking knowledge, I recognize that for many people it's not. So, let's get everyone up to speed on how this technology works. But first, let's see what we want our network to look like.
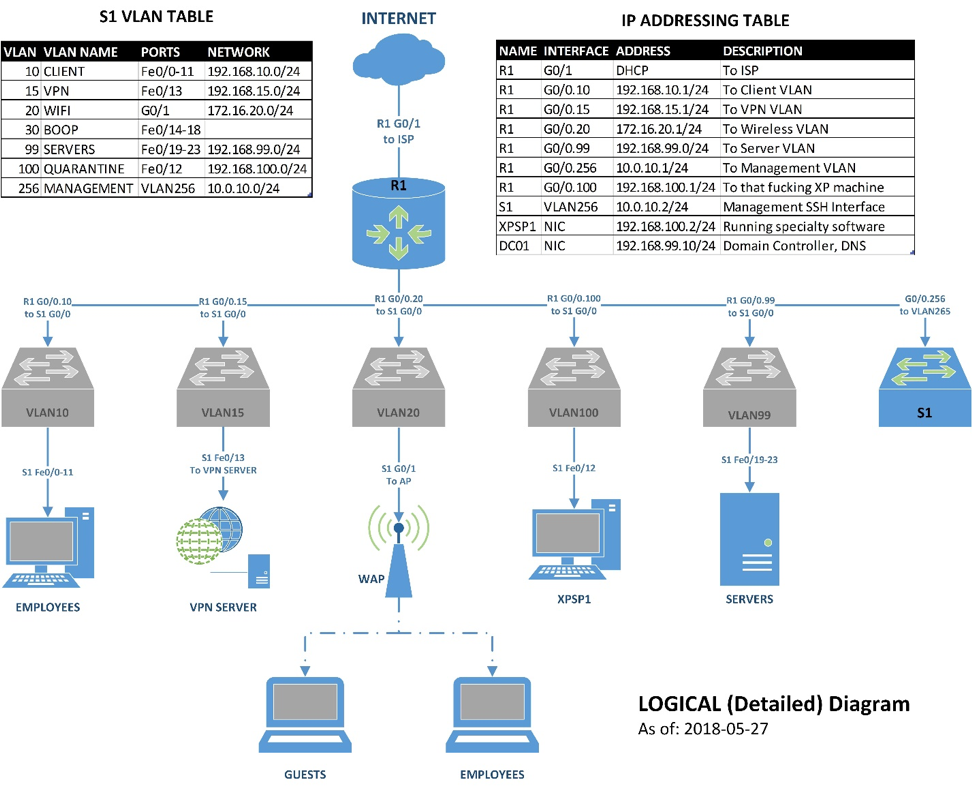
The above is a logical network diagram. Logical in this sense means that this is how the network looks to the devices connected to it. Our previous diagram was a physical diagram that represented how things are literally connected, though it was missing details such as room numbers and port numbers.
Networking Note. Your network diagrams should:
- exist before you deploy a network
- be available when you troubleshoot, and
- be backed up so you don't lose them.
Your network diagrams are your sacred map to the ancient city of "Everything Worked Yesterday".
Virtual Local Area Networks (VLANs)
Our diagram shows VLAN10, VLAN15, VLAN20, VLAN99, VLAN100, and VLAN 256 are connected to the router ports named G0/0.10, G0/0.15, G0/0.20, G0/0.99, G0/0.100, and G0/0.256 respectively. Port G0/0 is a single physical port on our router to which all our VLANs are connected. This is called a trunk port.
Any port that is not a trunk port only carries traffic from one assigned VLAN. A trunk port encapsulates and tags VLAN traffic with the originating VLAN number so the connected device knows what VLAN the packet is for. Traffic from one VLAN will only ever reach another VLAN through a router. VLANs are treated, logically, as separate networks operating on separate hardware.
Access Control Lists (ACLs)
Access Control Lists (ACLs) are Cisco's proprietary name for firewall rules. Microsoft uses the same name for file system privileges, so ignore that for this post. An ACL is just a rules-based firewall that checks incoming or outgoing packets. This check starts at the first rule in the ACL, and steps through the list and stops at the first match for the packet being processed.
There is incredible performance optimization that can be done with ACLs. For our network we are concerned about being functional rather than optimizing for packets per second. Here are our basic guidelines for creating ACLs:
- Apply as INBOUND
- Allow necessary exceptions to your broad denials
- Deny broad categories of traffic
- Allow broad categories of traffic
- Deny all
Cisco's implementation has an implicit "Deny all" rule at the end of each list. I don't like implicit rules, so I add it explicitly to all my lists so that I remember it. There are some example ACLs included later.
Implementation
Network Segmentation
Let's talk about our goals again, to give context to our logical diagram. Good network segmentation is possibly the most cost-efficient security control in any environment. Aggressive traffic control within your network limits attacker maneuverability in an opaque and non-interactive way. If an attacker does not know what the traffic restrictions are, then they are likely to make noise trying to learn it.
Network segmentation is also a way to add security to typically insecure devices, such as old or unpatchable machines in your environment. We can also use network segmentation to prevent attackers from tampering with our network infrastructure.
Best yet, a well-planned phased deployment will have no impact on the intended function of the network. Here is our deployment plan:
- Segment network (no/minimal filtering)
- Monitor and analyze traffic to high-value or vulnerable assets
- Implement ACLs/firewalls to cut out unnecessary traffic
- Harden the network.
Hardening the network is not connected to network segmentation and is a complicated task. We will cover some basic steps that add to the work we're already doing.
Step one: Segment the Network
Different hardware vendors have different names for technology and steps for configuration. Our goal is to separate our single network into several networks. We aren't worried about security yet.
For our example network we need seven VLANs:
- A CLIENT network for our desktop workstations
- A VPN network for our remote workers and mobile workstations
- A WIFI network for both our guests and employees
- A black hole (BOOP, it doesn't stand for anything) VLAN that unused switch ports will be assigned to
- A network for our SERVERS to reside on, away from our workstations
- A QUARANTINE network for those unpatchable devices running specialty software
- A MANAGEMENT network that is used to manage our switch and router.
Here is what we need to do:
- Create VLANs on the switch and assign them to switch ports
- Create virtual interfaces on the inside-facing interface of the router and assign IP addresses to them
- Configure the switch and router to trunk VLAN10, VLAN15, VLAN20, VLAN99, VLAN100, and VLAN256.
- Configure the router as a DHCP server or to forward DHCP requests to a server
- Configure Network Address Translation (NAT) so that all your VLANs can access the internet.
At this point the network changes should be invisible to end-users. Active Directory will update DNS records for most resources automatically and the router automatically knows all networks to which it is immediately connected and can route between them. Aside from the brief downtime to deploy the configurations the network should be operational again almost immediately.
Aside: Wi-Fi & Remote Access
Wireless networks are a handful to manage. There are measurements to take and factors to consider when deploying wireless networks. Instead of doing any of that we are going to do it the safe and lazy way. We need to get the Wi-Fi separated from the rest of our network as soon as possible, so we are going to configure it before we do anything else.
Guests and employees will use the same wireless network in our simplified example. This network will use standard wireless security: WPA2-PSK, AES, and a 12-character password nicely printed and framed in the reception area.
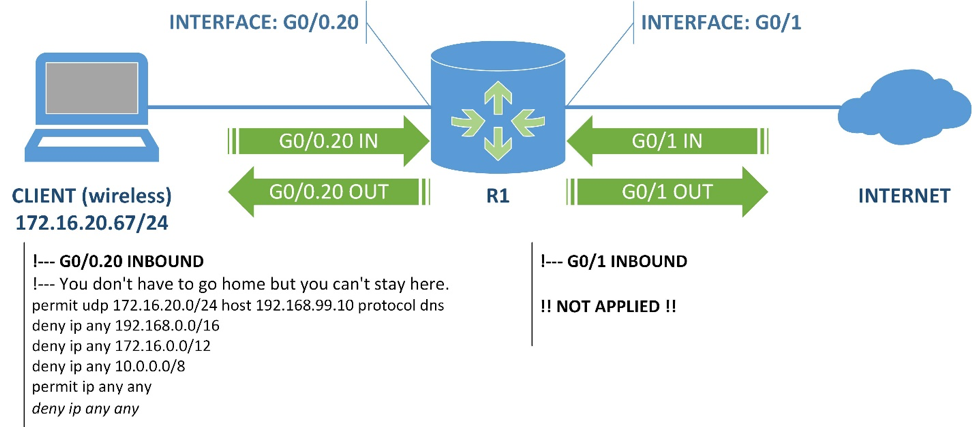
The access point is connected to a port on our switch assigned to VLAN20. S1 passes traffic from VLAN20 to R1's G0/0.20 port, which has the following ACL assigned to filter INBOUND traffic:

ACLs I present follow the format: (permit | deny) (ip | tcp | udp) (any | host <source> | alias <alias-name>) (any | host <destination> | alias <alias-name>) [(protocol | port) <value>]. This is not an industry or vendor standard, but it is close to Cisco's rules. My ACLs are examples and leave out rules that are not the focus of this post.
Let's step through this ACL:
- If incoming traffic is dns coming from 172.16.20.0/24 and is destined for our on-premises DNS server at 192.168.99.10, then it is passed. If not, check next rule(s).
- If incoming traffic is from any network and is heading to 192.168.0.0/16, 172.16.0.0/12, or 10.0.0.0/8 then it is dropped. This prevents any traffic from the wireless network from reaching our internal network. If not, check next rule.
- If incoming traffic is from any network going to any other network, then it is passed.
- The deny ip any any is an implied rule on Cisco devices, and I add it explicitly to the end of all my ACLs.
TL;DR version: Wireless clients can talk to the DNS server on our network, but cannot send any other traffic destined to internal networks. Anything going out to the internet is fair play.
Employees who have laptops connected to our wireless cannot access any company resources. They must access the company network through a VPN (below). For the purposes of this post on network design, I will assume you have a VPN solution in your network.
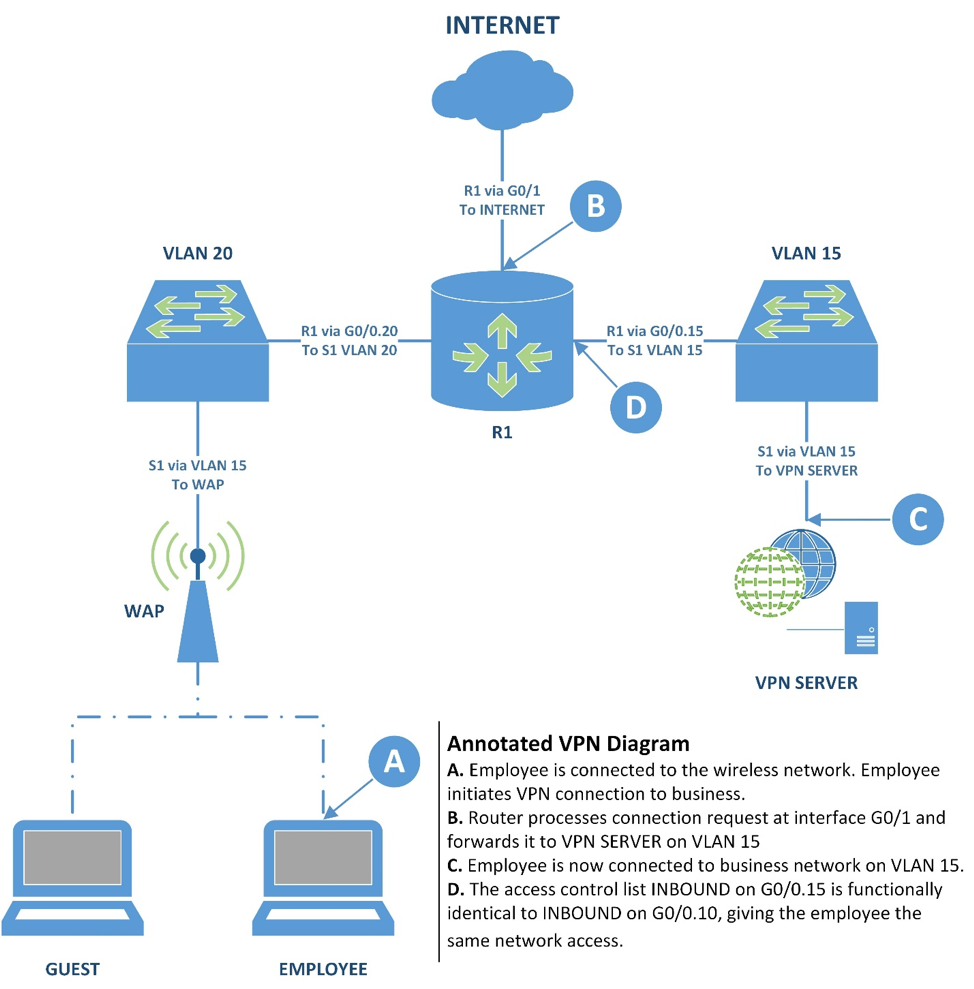
- The employee connects to the wireless network. Then, the employee connects to the VPN, which is located at the company's internet-facing IP address (R1's G0/1).
- The router receives the connection request and forwards it through G0/0.15 to VPN SERVER.
- VPN SERVER confirms the connection and the employee is connected to the network through VPN SERVER on VLAN 15.
- The INBOUND ACL on G0/0.15 is functionally identical to the INBOUND ACL on G0/0.10 (shown later). The employee has the same access to company resources through this VPN connection that they have on a desktop workstation.
Right now, G0/0.10 and G0/0.15 do not have ACLs. This is fine because our next step is going to be determining our ACL rules.
Step Two: Monitor Traffic for ACL Creation
We separated the network into VLANs so now they are, logically, different networks. This creates a natural choke-point for network traffic at the router. We are going to use that to monitor our network for a bit.
If our switch supports port mirroring, which copies traffic from one interface to another for capture and analysis, then we are golden. If you have a switch that can mirror VLAN specific traffic, then you're platinum (or something better than gold). If we don't have any kind of mirroring, then we are going to plop a device between our switch and router to monitor traffic.
Getting the Packet Captures PCAP(s)
The most proper way to do this is to mirror or tap traffic between S1 and each of your servers on VLAN 99 and VLAN 100 one at a time. This takes the longest but provides you with the clearest files for analysis. I suggest long captures of 12-24 hours because we want to catch timebound traffic like backups. Set up a monitoring station running Wireshark and catch the traffic, we'll use the files in the next step.
You might also want to catch traffic on VLAN 15 to and from VPN SERVER while a client initiates a connection and connects so that you know what traffic you need to allow.
If your switch supports VLAN mirroring, then you can catch all the traffic from VLAN 99 or VLAN 100 all at once. It is the same process as above, but the file will be much larger and will require more time analyzing it.
If you want to cheat, you can mirror the traffic from the trunk port if your switch allows it and then parse and analyze that. The Wireshark wiki has an entry for setting up VLAN capture on several operating systems. Record the trunk traffic and carve out the traffic to different networks afterwards.
Analyzing the PCAPs
Now that we have PCAPs, you have to fire up Wireshark and do some analysis. We need to identify the types of traffic that goes from the CLIENT and VPN VLANs to the SERVERS and QUARANTINE VLANs. Broadly, the steps for our analysis are:
- If you captured multiple destinations in SERVERS or QUARANTINE, we need to isolate traffic going to a station in VLAN 99. Filter by source (VLAN 10, 192.168.10.0/24) and destination (DC01, 192.168.99.10). Example: ip.src==192.168.10.0/24 and ip.dst==192.168.99.10. You will want to save this filtered traffic to a separate PCAP file and work on that for the next steps.
- Generate a Protocol Hierarchy chart. Press Statistics > Protocol Hierarchy. Image below from Analyzing Large Capture Files Part 2 - Protocol Hierarchy, by Chris Sanders.

- The Protocol Hierarchy chart will sort by frequency of protocols had the most traffic, so maintain that order as you make notes. Example: DNS (UDP & TCP 53) from VLAN 10 to 192.168.99.10, DHCP (UDP 67, 68) from VLAN 10 to 192.168.99.10, NTP/SNTP (UDP 123) from VLAN 10 to 192.168.99.10 (This example is not representative of actual network traffic.)
- Repeat this for each server in VLAN 99 and 100.
You will end up with a list of traffic types, ranked by density, leaving the CLIENTS and VPN VLANs and going to SERVERS and QUARANTINE. We recorded the protocol and the TCP/UDP ports. Using this information, we are going to build our ACLs to filter traffic on its way out of CLIENTS and VPN.
We want to also analyze our PCAPs for traffic leaving each server that goes out to CLIENTS and VPN. This work is the same as before, except we are looking at the destination networks 192.168.10.0/24 and 192.168.15.0/24 rather than a specific host. This analysis would be used to create an ACL to filter traffic on its way out of SERVERS and QUARANTINE.
Example: ip.src==192.168.99.10 and (ip.dst==192.168.10.0/24 or 192.168.15.0/24)
Aside: Saving Work
The goal of our ACLs is to restrict internal movement, but if we really wanted to we could save ourselves some work. The largest attack surface in the network is the client workstations because they are used by end users who interact with the internet. If an attacker is inside your network they are going to begin in CLIENTS or VPN, and their goal would be to get access to SERVERS or QUARANTINE.
If we were really strapped for time, you can put off restricting traffic leaving SERVERS or QUARANTINE because CLIENTS and VPN would restrict traffic back. I suggest not cutting corners on this because proper segmentation is a very powerful security control.
Step Three: Designing and Deploying the ACLs
I reference aliases in this section. An alias substitutes in for a set of rules or addresses/protocols. I use them as short-hand, so I don't have to write out a bunch of the same addresses in the different places. This section is mostly examples to give you an idea of the kinds of ACLs we are implementing.

So, a quick explanation of these aliases:
- rfc1918 covers all non-internet routable addresses. We will use this to prevent any internal traffic we don't explicitly allow.
- internal-net is all the "internal" networks we have. We will use this to allow servers to reach all internal clients outside their home VLAN.
- services-client is the list of traffic types to servers in the SERVERS VLAN.
- quarantine-client is a list of protocols CLIENTS and VPN require for the specialty software in QUARANTINE. In our example network, it turns out it's just FTP.
- network-management is a list of stations and protocols required to configure the switch and router. We will use this to allow specific stations access to the management interfaces of our network infrastructure.
Now that we have our aliases, let's look at our example ACLs. They are commented to provide some context.

These example ACLs are not likely to be the best implementation for your environment. If you put in the work described in previous steps, you will have the information you need to make ACLs that reflect your actual environment.
I would suggest a phased deployment but, in our case, things will break if not all implemented at the same time. TCP connections begin on one port, then move to a separate pair of ports to free up the listening port. Appending the word established to the rule will track what TCP connections after they are established so they may remain connected. We are relying on this behavior so that we do not have leave open all the other ports that conversations can move to after they are established, and to allow servers to respond to traffic initiated by clients.
Step Four: Harden the Network
There is a long list of things that can be done in the interest of generally hardening the network infrastructure. We are going to focus on the things that align with what we have already done.
Most of our hardening is a matter of reducing the attack surface of the network components. Luckily, we've built a huge component of that into our CLIENTS ACL in the previous section. Here's a diagram to help explain this one.

Our IT Department has a workstation from which they manage the network. In our examples it is 192.168.10.2 from CLIENTS. We permit traffic from that host to reach 10.0.10.0/24, which is our management network. This workstation can connect to both R1 and S1's management interfaces. We will have configured R1 to only be configurable from 10.0.10.1. This protects the network infrastructure from some software vulnerabilities that they may have that would allow an attacker to change the configuration of your infrastructure.
Disable telnet entirely on both the router and switch. If we are working on the CLI then we need to be using SSH. If we are going to use a web GUI then we must disable HTTP and force it to use HTTPS. Even with segmentation in place, we need to ensure that our traffic is encrypted.
Shut down any switch ports that are not in use. Configure port security on all client ports so that the port will shut down and log an error if the endpoint's MAC changes. This prevents attackers from physically connecting to your network.
Summary
With my background in computer networking, I consider segmentation to be a basic security control that should be built into every network. InfoSec professionals often advocate for network segmentation, but I have not seen anyone explain how to design and implement it. I suspect many people who don't have the same experience with networks and who will find this information valuable.
So, let's review what we have done here.
- We set out our design goals, and kept them in mind throughout the process
- We learned about ACLs and network segmentation as concepts
- We transitioned our flat, singular network into multiple networks without adding additional hardware or software
- We examined the traffic moving through our networks to get a sense of the traffic we need and don't need
- We designed and implemented ACLs that limit access to high-value or vulnerable resources
- We did some additional hardening in our network that will prevent attackers on-site from gaining access to our network or traffic.
There are a lot of strong security controls built into things many businesses already own and they just need to be configured. In future entries I am going to look at how to further secure an environment against lateral movement and hardening Windows with non-disruptive security measures.
Support the Author
NotAwful writes about networking, security, and tabletop games. You can support their content via Patreon (USD), or you can leave a tip if you found this post useful.